To Render Images Using the Render Images from Light Setup Dialog
-
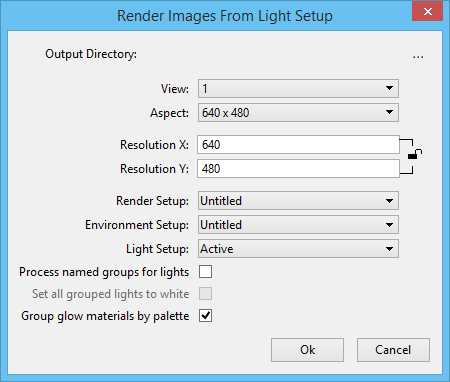
Click the Render Image Set icon in the Effects Manager dialog.
Render Images From Light Setup dialog opens.
- Click the Browse icon and create a new folder for the image set.
- Set the Aspect to desired resolution.
- Set the View you want to render from.
- Select a Render Setup from the drop-down list.
- Select an Environment Setup from the drop-down list
- (Optional) Turn on the Process named groups for lights check box.
- Select a Light Setup from the drop-down list.
- (Optional) Turn off the Group glow materials by palette check box. This will create only one entry per palette for all the glow materials available in the palette to prevent rendering of a black image.
-
Click Ok to start the rendering process.
Note: The Effects Manager does not render in a separate thread like the Luxology dialog does. So you will have to wait till all the images render, before continuing to work in this session of MicroStation.Tip: You can retrieve your original setup which contains the default lighting without any adjustments. Once you have rendered the image stack, use Save Image Settings As and change the name to "initial light setup". You can always open this .efx file and push the light colors and the lumen values back to the design to get the original settings back.